Hello all, I'm back from the dead! Camp has started since last I posted and it's keeping me very busy. I work at the Village Center for the Arts five days a week from 8am-4:30pm. This week's theme is pottery wheel and sculpture and we have 17 kids enrolled! That's three more than the maximum we have for pottery wheel weeks and it's hectic. I even teach private pottery wheel lessons after camp some days and today was one of those days as well. So my schedule for today was 7:30-4:30pm clay camp, 4:30-7:00pm private pottery wheel lesson, and when I got home I worked on my own private ceramic projects in a studio I set up in my basement. SO MUCH CLAY.
Working at the VCA is difficult and trying at times but rewarding in the end. I teach children between the ages of 7-14 various media depending on the theme of the week. There's a huge range of talent between the children in any given week and I have to be on my toes at all times. I have a lot more appreciation for teachers, especially teachers for young children, than I did before I taught. I enjoy it but at the same time I would really like to work with students who are older and who are most interested in art and conception. I am so passionate about art that it is disheartening to watch children completely lose interest, destroy, laze about, and lack ambition when it comes to their project. However, sometimes I do get a challenge and that is when I am most excited about working with a child. I am there to teach them and when I get a chance to really make a powerful suggestion to make their project successful, it is entirely worth it. As much as I love children, I could never make a career teaching them.
News Update: If you haven't read into it by now, I have set up a small ceramics studio in my basement. After taking over a corner, I finally organized most of my supplies and worked with my dad designing a plaster wedging board and a few storage shelves and table. I have an electric wheel set up and now I'm producing work. After a long day at work it's hard to jump right into the pottery wheel but I'm working in some time here and there. With only a little over a month left of working time for the summer, I have a lot to accomplish on my quota. I'll be posting some photos of my studio and the work I create throughout the summer.
Until next time!
Monday, July 18, 2011

Tuesday, June 14, 2011
Website Face Lift!

I spent many hours yesterday working on bringing my website to clean and more organized look. I still have to upload many new photos of my work but I thought I would give it a test run today. Please check it out and let me know what you think!
With today's electronic world, it is essential for a striving artist to be active on the web and promote themselves to the general public. I'm working on making my website also easy to navigate on smartphones and tablets so I can stay ahead of the game and get my name out there!
I am working on setting up a fully functional pottery studio in my basement right now. I will have photos of my studio and work as it nears completion. I begin working at the Village Center for the Arts this coming Monday and it will be the start of a very busy summer for me. I will be working full time during the week, throwing pottery after work, and seeing my boyfriend on the weekends.
Ready. Set. GO!
Monday, May 16, 2011
Finished pieces

Teapot 1: Clay: Cone 10 VC Porcelain #1. Glaze: Sweet Sexy Chun Red Reduction. Slip casted and thrown form.
As you can see, the bottom of the teapot is broken. The glaze I used is very runny and it ran so much that the glaze made a pool around my teapot and welded it to the shelf. My professor knocked it off with a piece of wood and this is what remains. The spout and handle were slip casted from a mold I hand-built.

Teapot 2: Clay: Cone 10 VC Porcelain #1. Glaze: Turquoise Celadon Reduction. Slip casted and thrown pieces.
As much as I love this teapot, the lid is sadly welded to the top because a little glaze ran into the crevice. Same handle and spout as previous teapot.

Untitled. Clay: Cone 6 Porcelain. No glaze. Hand built pieces and original packaging.
Hand built McDonalds meal out of porcelain. There is a previous post about this project but here is a more professional photo.

Rising. Clay: Cone 04 White Stoneware. Glaze: Linda Arbuckle's Majolica. Hand built.
This is my first figure sculpture. She is half to three quarters life size and built hollow. I was rushed into building this in three or four days when I would have ideally worked on it for a couple weeks to perfect it. I learned a lot while building her and I cannot wait to start a new one to make it even better.
Where to even begin...
Yes, I'm still alive, thanks for asking. The last couple of months have been extraordinarily busy and energy draining that I've been kept away from blogging, and I apologize. On a good note, I have finished the spring semester of my junior year at the Hartford Art School! Now, officially a senior, I am taking a summer workshop where I am learning how to construct a wood fired kiln. The first day of class was today and will last only a couple of weeks, then I will finally be able to come home! For how long, who knows, but I just need a few days rest! I had my very first "lazy day" last week where I didn't even go to the ceramics studio but besides that, I am working constantly. I'll give a couple more detailed posts about specific projects that I've completed shortly.
Thursday, March 24, 2011
3800 mussels, 940 blades of grass, and 500 brown dots on my hands


My teacher, Dawn Holder, is having a show in Tampa, FL for this year's NCECA (National Council for the Education of Ceramic Arts), which is next weekend. I have been one of her busy little helpers getting everything made for this show and I have to say...NO MORE MUSSELS!
Theme provided by NCECA for about ten of these installation shows is migration. Dawn's project is about these invasive mussels from China that are not inhabiting the waters near Tampa. There will also be clusters of sea grass that are native to Tampa but are now invading Chinese waters. These will be displayed in a ten by twenty foot gallery space. She is also bringing with her giant logs that she will cover with clay and then place the mussels into the clay just as they could come out of mud in the water. The picture on top shows these mussels with a coat of pearlescent glaze on them before firing and the picture on the bottom is after they have been fired. To make these mussels, Dawn and I made press molds from actual mussels in plaster. Then small bits of clay could be pressed into each mold and after the clay stiffens up a bit, the two halves can be attached. Before being bisque fired, they are given three layers of color sliped, turquoise, brown, and black to imitate the natural colors of mussels. Then after the bisque firing, they are dunked into glaze and given a final firing. The same process was used for the blades of grass. The small patches you see on the glazed mussels are where we had to wipe away some glaze on the bottom before putting them into the kiln because otherwise they would glue themselves to the kiln shelf. That can latter be patched up with clear nail polish.

I also noticed this the same day I was unloading the mussels. I currently have many many brown dots the size of the head of a needle clustered on the tips of my thumb, index, and middle of my right hand with scattering every where else on my hand and palm with a small cluster also on my left hand in the pouch between my thumb and index finger. These spots do not itch or wash off. They seem to be embedded into my skin. I was beginning to freak out a lot last night and wasted a couple hours researching online about what it could possibly be but I could not find an answer. There are plenty of people online who have posted on forums that described exactly what you see in this photo but no one had a clear answer. I showed this to my professors today and we have found the culprit: silver nitrate. I was making a cone 10 in-glaze luster recipe with a couple other students for my surfaces class and I was handling toxic materials. I'll pause for a moment and just say that I work with around materials that could harm my health and I especially have to be careful with the air that I breath and wear a respirator when I am adding particles to the air around me that could get in my lungs. This glaze called for 50 grams of silver nitrate, which costs about $100 and comes in small 25 gram pill-like bottles. I was wearing a respirator and goggles but for some reason I didn't wear gloves while opening these bottles and emptying them into the glaze buckets. For the rest of the glaze making process where I was in direct contact with materials, I did wear gloves. I guess since I thought that I wasn't actually touching the material inside that I wouldn't get any on me but there must have been traces of the material on the small jars. Silver nitrate has real silver in it and it is toxic and corrosive (which I later found out by experience). The metal can leave stains on skin and can even leave burn marks if really grabbed by the horns. The little amount that I came into contact with will not do any harm to me but I will have to suffer with "dirty" fingers for few days to a few weeks. My teacher, Matt Towers, has experienced this before himself and assured me that I will be fine but this must be a lesson to me to always wear gloves! It looks like someone dipped a toothbrush in brown paint and then ran their finger over the bristles so the paint flicked off onto my hand in the tiniest of flecks. These spots also accompany a slowly fading rash on my wrist that I got from mixing glaze the other day...I promise to take better care of myself!
Some days are not good days
 |
| Not feeling it... |
 There are days where I can't throw. Throwing is like playing a sport or instrument; the longer I go without practicing, the more I need to catch up to get good again. Well it's been a while since I've just sat down and thrown a few vessels and well, it didn't turn out so great as you can see! My problem is that I like to throw thin and I don't think I was taking enough time to center my clay perfectly before making my cups and they were off center. Even if you are just the tiniest bit off center while throwing thin, your cup will begin to wobble and it can quickly become a disaster. However, these were good warm ups for me as I was really intending to throw a new body for my urn that was previously destroyed (note a previous blog where I showed a failed urn that I had made for those who don't remember). The picture on the bottom shows part of my urn that I had thrown (the large one closest to the camera on the left). This is one of two damp boxes that I made earlier this week which took 2 hours to make! It will make my life so much easier since I won't have to run the risk of potentially ruining a pot by covering it with plastic and these pieces will stay wet longer in the damp box then covered by plastic. A longer drying period is essential for more difficult pieces where I attach clay, such as handles, and need more time for the clay to dry evenly so nothing cracks. You can see from this picture that this is the stage of clay before I trim the bottoms. Trimming will take away much of the excess clay and I can really define edges and clean up the surface when the clay is leather hard.
 Seems so long ago...

Almost two weeks ago now was a mid-term critique for my malleable object class. Finally, after many weeks of work this project is now complete and this is what it looks like displayed on a wall. It was so relieving to have it completed. I wish the wall was in better shape but it will have to do until I get a better picture of it. I was one of only a handful of people who had both of their projects completed in time for the critique. My teacher, Dawn, was not too happy about the lack of effort and work put in by most students so hopefully our next and final critique will be much better.
To me, this piece is an inspiration for future pieces to come. I really enjoyed using the majolica technique to paint on the surface of these tiles and the concept is really cool for me. The center figure/creature is how I would picture myself if I were to be a combo-animal figure. I could definitely see myself creating many more of these "plates" and displaying them together in a gallery. The idea behind this is almost purely decorative. I am attracted to patterns and bold colors and I am also a perfectionist. This project allowed me to use all of that and I am a very process driven person with regards to my work. I dedicate a lot of time to each of my pieces and I want to make it as clean and perfect as I possibly can.

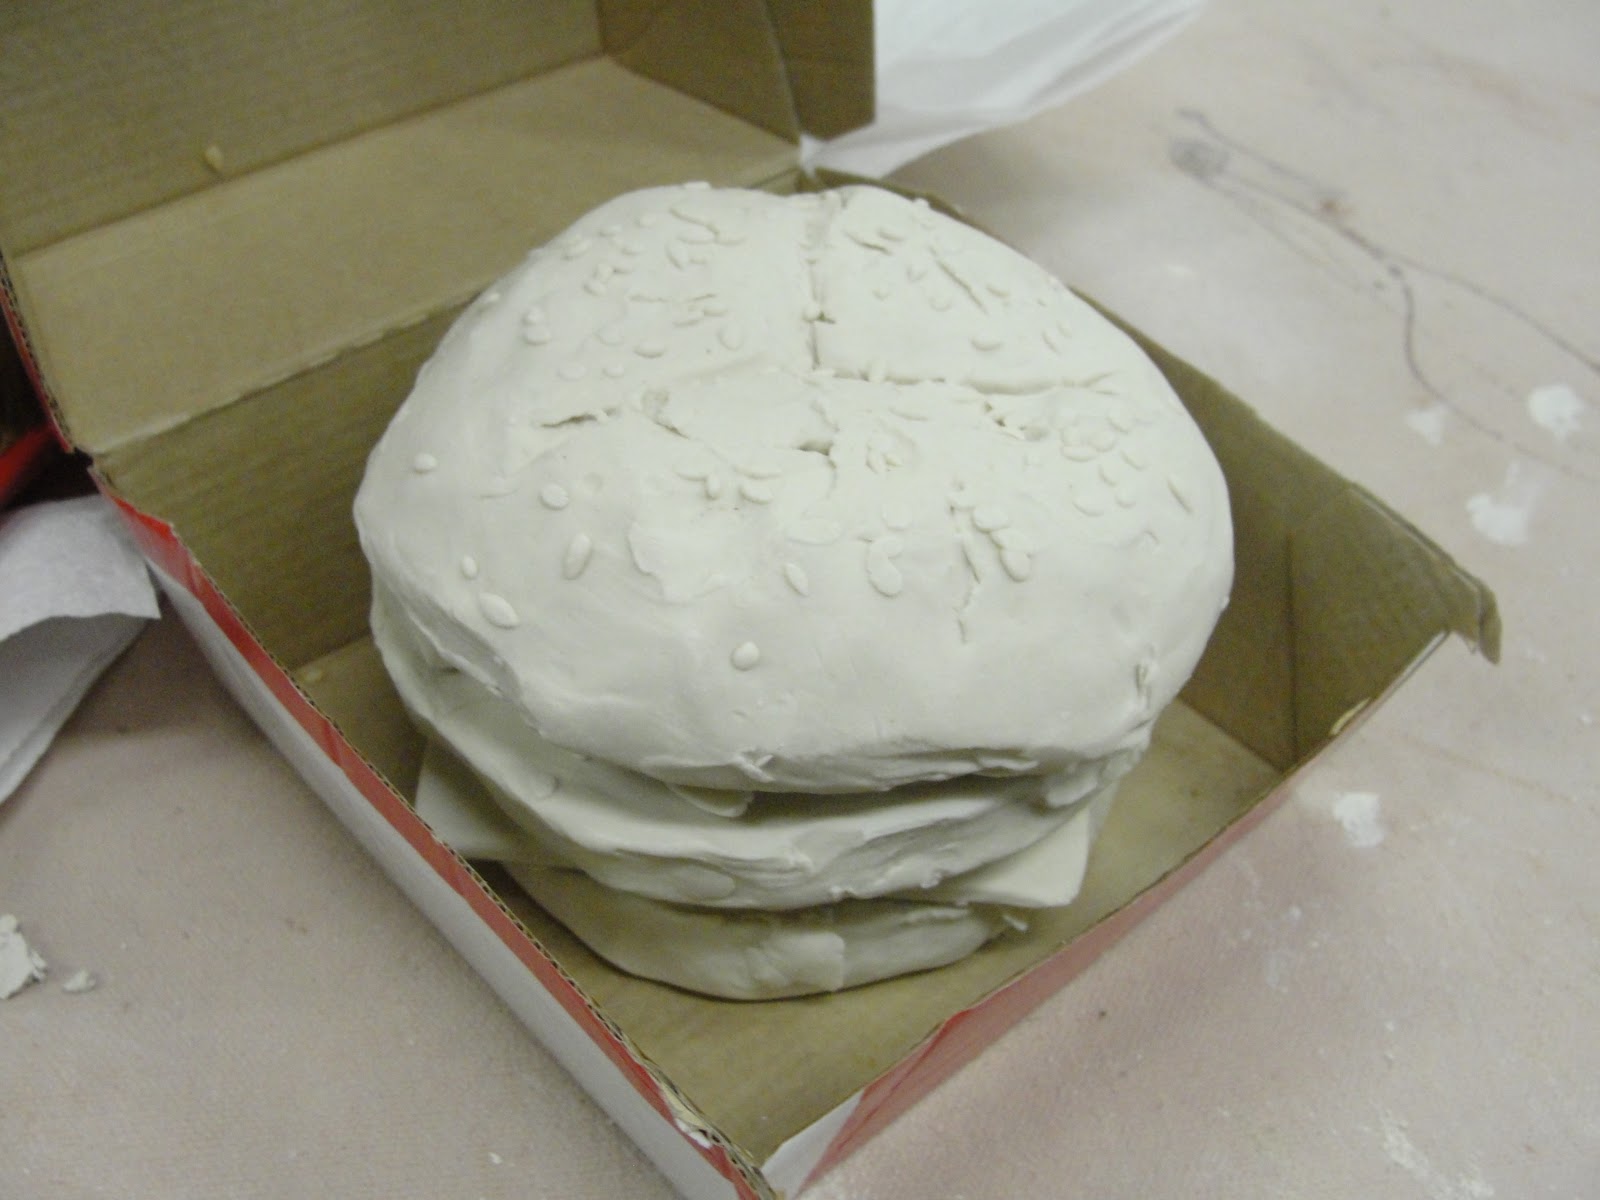 My other project was casually placed in the studio on one of the tables that I would normally eat at on any given day. This is just porcelain fired to temperature without any surface treatment added to it. I didn't want to trick the viewer into thinking that it might have actually been real food by painting realistically because that isn't the point of this piece. I wanted to call attention to the physicality of the clay and how even though it may look like something you would eat, you could not have it. Also, being drained of all color is a metaphor for the lack of nutritional value that this meal contains. I tried to make this project as detailed as possible. I feel like I can almost smell the french fries!
Subscribe to:
Posts (Atom)